The VC-3 / DNxHD encoder uses fixed bitrates depending on the video format, this is, the video dimensions and frame rate.
First, select the VC-3/DNxHD encoder in the “Produce” panel :
2: Manually Configuring the DNxHD encoder
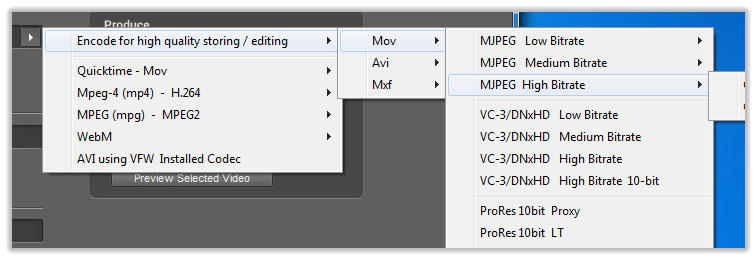
The DNxHD encoder can be selected in four flavors, low, medium, high and high 10-bit bitrates. Depending on the final video format, an official DNxHD
bitrate will be automatically selected.
For instance, if you imported several videos in 720p24, 1080i30 and 1080p50 and have selected “VC-3/DNxHD Low bitrate”, to know what bitrates will be
assigned to each video press the button “Codec Info”:
When procesing the videos, the final bitrates assigned to each video will be :
720p24
60Mbps
1080i30
145Mbps
1080p50
75Mbps
Please note that when selecting the high 10-bit encoder mode , the bit depth can be upsampled from 8-bit to 10-bit using several modes, including dithering
or the DCR upsample mode , please see the tutorial upsampling bit depth for more information.
After configuring the encoder mode, press the button start to produce the final videos.
The VC-3 / DNxHD encoder only accepts standard HD formats, this is a dimensions of 1920x1080 or 1280x720, and 24,25,30,50 and 60 frames per second.
If your imported videos are in SD/4K or in HDV (1440x1080), or in a non standard frame rate, you must convert then before encoding with DNxHD.
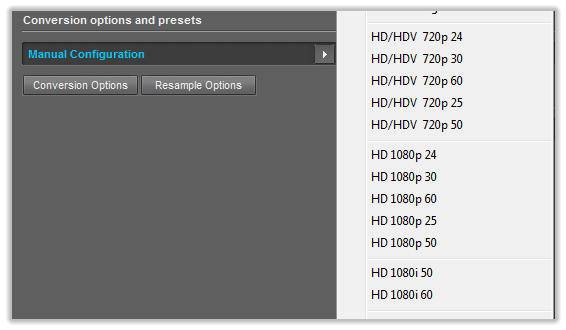
To convert the videos for DNxHD encoding, go to “Settings” panel, and select a HD conversion presetting:
2a: DNxHD encoder formats
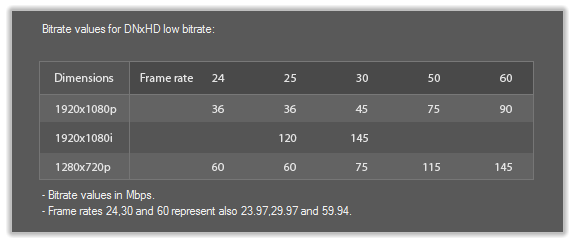
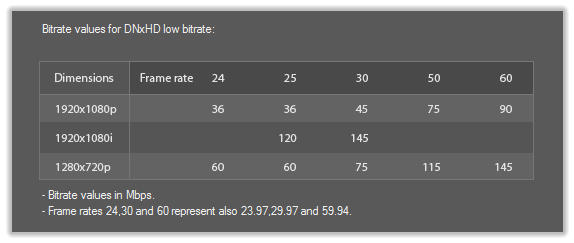
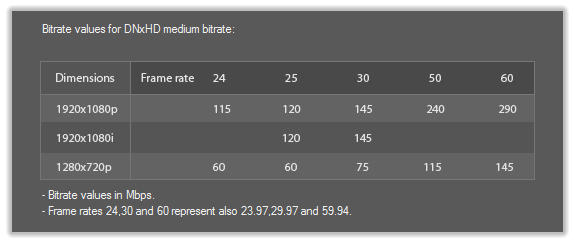
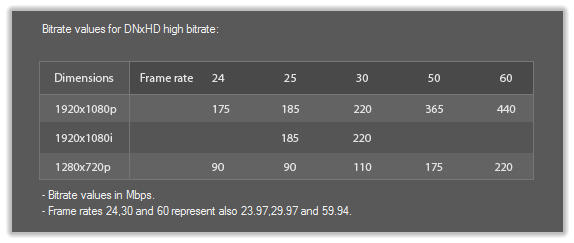
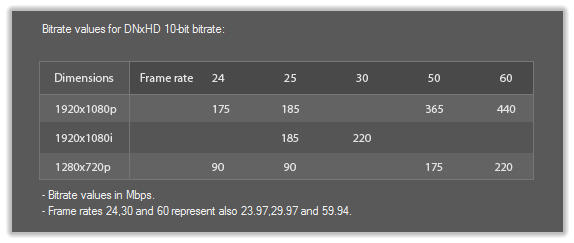
These are the final bitrates depending on the final video format and the encoder setting selected :
VC-3/DNxHD Low Bitrate:
VC-3/DNxHD Medium Bitrate:
VC-3/DNxHD High Bitrate:
VC-3/DNxHD High Bitrate 10-bits :
2b: DNxHD fixed bitrates
Copyright © 2022 Acrovid. All trademarks are property of their respective owners
Support
Products
Resources
About
1: Automatically Configuring the DNxHD encoder
The VC-3 / DNxHD encoder uses fixed bitrates depending on the video format, this is, the video dimensions and frame rate, the
DNxHD encoder can be configured automatically or manually.
DNxHD encoder can be configured automatically by loading a DNxHD preset.
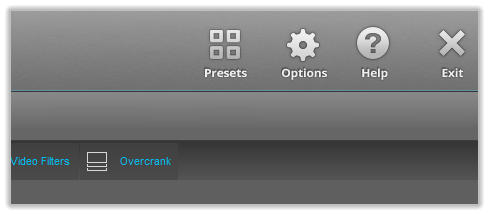
Open the presets dialog by clicking the presets button in the main window :
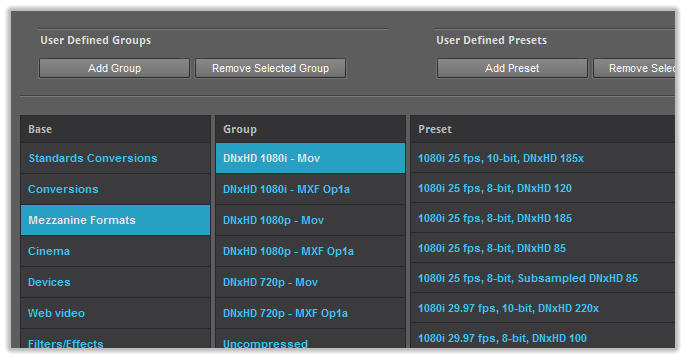
Then after selecting “Mezzanine formats” , select the DNxHD base, this is ,1080p, 1080i or 720p, in Mov or MXF format:
Finally, just select the format from the presets list and press the button “Select Preset”, Acrocode Studio Pro will be configured to use the selectec DNxHD format
to encode all videos in the processing list.
For instance, to use the format DNxHD 115 1080p24 8-bit, just select it in the presets list:

Sign up for our newsletter to receive
news and special offers

Acrocode Studio Pro™ tutorial: encoding to VC-3/DNxHD in 8 or 10 bit.

Press/Affiliates
Share