Copyright © 2025 Acrovid. All trademarks are property of their respective owners
Support
Products
Resources
About
Sign up for our newsletter to receive
news and special offers

Press/Affiliates
Share


About
About
User Guide
Configuring Orvid AI
Activate Orvid AI by checking the button “Orvid AI” :


AI powered video enhance
Acrovid,neoFootage AI, Core AI, HDRconv AI, superChroma AI and SuperBitdepth AI are trademarks or registered trademarks of Acrovid, All other trademarks or registered trademarks like Adobe Premiere, After Effects, Dacinvi Resolve, Avid, Avid Media Composer, ProRes, DNxHD, GrassValley, NVIDIA,
CUDA,Intel, Quicksync or Cineform mentioned in this document are property of their respective owners. Reference herein does not constitute or imply affiliation with our company, endorsement, or recommendation. Some videos on this webpage are from Videezy.com

For neoFootage AI
Upscaling the video
AI upscaling is automatically performed when setting a video resample mode in the transform panel.
For previewing the upscaled video, select a upscaling mode in preview dimensions:
Tips and tricks
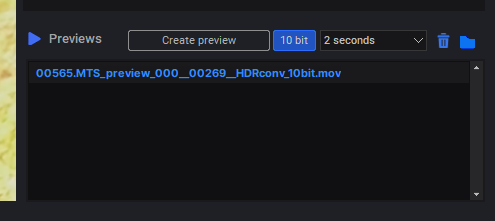
Creating previews
For creating a video preview with the current settings press the button “Create preview”, the previews are created in
DNxHR format in 8-bit or 10-bit compatible with most players and editors.
For checking the configuration, it is recommended to create a preview.
The dialog video preview and the internal player show the video in fast 8-bit mode, click on the folder button to open the
previews folder to check the previews with your favorite HDR video player or editor.
To delete a preview, select it and press the delete button, the created previews are not deleted automatically when closing
the video.
Activating Orvid AI enhance with other AI processing settings
Orvid AI can be used along with any other AI processing feature.
For example when activating HDRconv AI, If the video present strong artifacts, noise, banding, etc, activate also Orvid AI to
improve the video before conertinf to HDr.

If the button “Auto” is checked, the selected preview dimensions will be automatically configured for the produced videos in the
transform panel.
In the transform panel the video can be upsampled to any supported video format dimensions.
GPU configuration
AI engine is compatible with Nvidia, AMD and Intel GPU cards, simply select the fastest GPU in neoFootage options dialog.
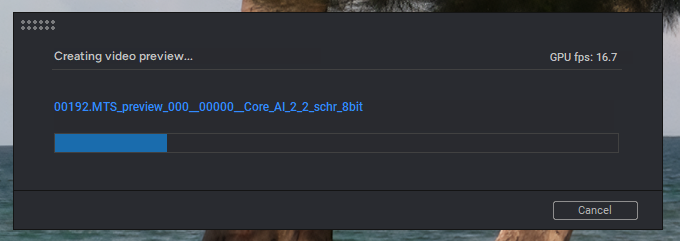
When creating a preview in the AI configuration dialog, the GPU frames per second processed can be checked:
The “GPU fps” information includes the time used for the video frames uploading to the GPU memory, the GPU processing, and the frames downloading
from the GPU memory.
This does not include the video decoding and encoding time, this allows to compare directly different GPUs and configurations processing speed
- Set “Low Latency Mode” to “Ultra
- Set “Power management mode” to “Prefer maximum performance”
Depending on the GPU card, these settings may increase the AI processing speed by 10-20%.
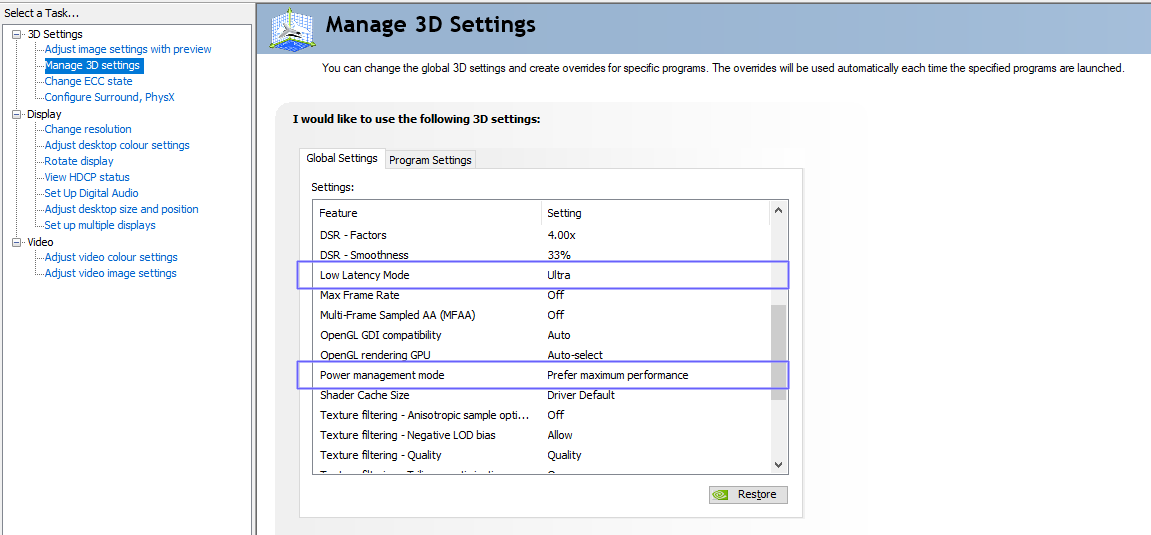
Nvidia GPU cards
For Nvidia GPUs, to get the maximum performance it is recommended to set these options in the “NVIDIA control panel” :
Set the current configuration
After configuring the settings, press the button “set configuration” to configure the AI model and check the effect in
the video preview.
When exiting the dialog, the configuration is saved for the video, or to all videos if the “all videos mode” is set in the
AI panel.
The enhance strength configures the video deartifacting , debanding and deblocking.
The default value is 1, if the video still present compression artifacts increase the enhance strength.
Configuring the enhance strength
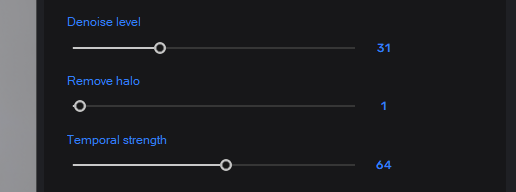
The video noise can be static or temporal noise:
- Denoise level removes static noise
- Temporal strength removes temporal noise
To remove video noise it is recommended to balance both values:
- Increase the Temporal strength to remove temporal noise
- Increase the Denoise level to remove remaining static noise.
For low noise videos, leave the Temporal strength default value 20 and increase the Remove noise value.
Denoising the video: denoise level and temporal strength
The temporal strength minimum and default value is 20, recommended for most videos.
Increase the temporal strength value to remove motion artifacts, noise, blocking or video fluctuations.
TIP: increasing temporal strength may blur the motion areas, create a preview to check the final effect.
Configuring the temporal strength
Model B allows to configure the detail level, the default value is 40, increase the detail level to create more details, or
reduce it to create less details.
Depending on the the source video, setting high detail level can create too much detail.
If the video is over sharpened, increase also the “Remove halo” setting.
Configuring the detail level in Model B


The halo effect usually appears when processing over sharpened videos showing borders or pixel artifacts around
fine details.
Increase the Remove halo setting to fix the halo effect.
Remove halo


100% crop showing deartifacting
100% crop showing remove halo effect
Configuring Orvid AI is easy, configure the settings and press the button “Set configuration”, the result can be checked
immediately in the preview video.


AI models
Orvid AI includes 2 AI models, Model A and Model B.
- Model A: designed for enhancing, denoising and creating details.
- Model B: designed for enhancing, denoising and upscaling creating details.
Model A is faster than Model B, it is useful to enhance videos without upscaling, and also for upscaling detailed videos, for
example HD to UHD.
Model B creates more details than Model A, and includes an additional parameter to control the detail level.